Premise
- Vitellogenin levels correlate with circulating calcium so maybe hemolymph calcium can be used as a proxy for reproductive development in geoduck broodstock
- notes from meeting with Jose Guzman: [https://shellywanamaker.github.io/17th-post/] (https://shellywanamaker.github.io/17th-post/)
- evidence in aquatic vertebrates: https://www.scielo.br/scielo.php?script=sci_arttext&pid=S0100-879X1998000800006
Pilot calcium assay
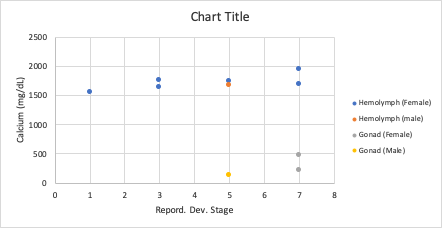
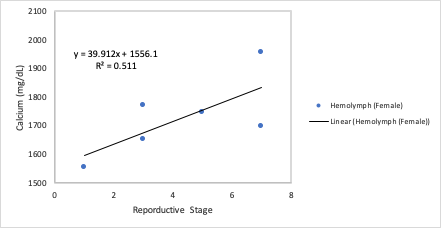
I found a positive correlation between developmental stage and hemolymph calcium levels in female broodstock
Full run Calcium Assay
To investigate the effect of pH on hemolymph calcium levels and the correlation between reproductive stage and hemolymph calcium, I performed a colorimetric calcium assay on temporal hemolymph samples from geoduck broodstock reared under constant low pH (6.8)
https://docs.google.com/spreadsheets/d/10AC6N0UNAnLc6LoQY8UDl8lZkm2ZCZcVk63-SMPvopE/edit?usp=sharing
Hemolymph samples from animals with gonad histology:
- Ambient: 11 animals with 3 time points and 10 animals with 1 time point
- low pH: 10 animals with 3 time points and 12 with 1 time point
Total samples: 85
Run samples and standards in triplicate:
- 96 well plate:
- 24 wells for standards (8 standards)
- 72 wells for samples (24 samples/plate)
- need 85/24 = 3.5 plates
Assay set up
- commercial protocol for Cayman Calcium Assay Kit
- Using 2 kits
1: Prepare 1x Assay Buffer
- 5mL of concentrated buffer + 45mL HPLC grade H2O
- combined the 5mL concentrated buffer from each of the two kits and 90 mL nanopure H2O in a flask
2. Prepare standards
- prepared 2x the volume the protocol described so:
- A: 200uL assay buffer
- B: 5uL Ca standard + 195uL assay buffer
- C: 10uL Ca standard + 190uL assay buffer
- D: 20uL Ca standard + 180uL assay buffer
- E: 40uL Ca standard + 160uL assay buffer
- F: 60uL Ca standard + 140uL assay buffer
- G: 80uL Ca standard + 120uL assay buffer
- H: 100uL Ca standard + 100uL assay buffer
- added prepared standards to dilution plate wells 89-96 (column 12)
3. Prepare 1:4 dilutions of hemolymph
-
this took about 3 hours
- locate samples
- locations are noted under the ‘DilutionPlate’ tab of this data sheet: https://docs.google.com/spreadsheets/d/10AC6N0UNAnLc6LoQY8UDl8lZkm2ZCZcVk63-SMPvopE/edit#gid=265280141
- scrape out some frozen lymph into labeled eppy tubes using a new pipette tip for each sample
- aliquot out 10uL of each into a 96-well PCR plate
- add 30uL 1x Assay Buffer on top and pipette up and down to mix (careful not to touch the tips to anything! and just hover)
- sample 01/23-037 only had 5uL so this was a 1:7 dilution rather than a 1:4 diluiton like the rest
4. Load assay plates
- load 10uL of samples and standards to each well according to plate map using multichannel pipette
- see ‘PlateMap’ tab of this spreadsheet: https://docs.google.com/spreadsheets/d/10AC6N0UNAnLc6LoQY8UDl8lZkm2ZCZcVk63-SMPvopE/edit#gid=265280141
5. Prepare Working detection reagent
- 37mL R1 + 37mL R2
6. Add reagent to wells
- added 200uL to all wells using a multichannel pipette
- sealed plates with plastic film provided in kits
- incubated 5 minutes while I walked over to meet Emma at GS around 1:45pm
7. Read plates
- Emma attempted to read the plates but the GS plate reader computer was not working. She was able to find another plate reader in GS but it could only read at 540nm and she was only able to snap cell phone pics of the data because the computer was old
- data here:
- plate 1: https://github.com/shellywanamaker/P_generosa/blob/master/Hemolymph_Calcium_Assay/data/20201125/playte%201.PNG
- plate 2: https://github.com/shellywanamaker/P_generosa/blob/master/Hemolymph_Calcium_Assay/data/20201125/plate2.PNG
- plate 3: https://github.com/shellywanamaker/P_generosa/blob/master/Hemolymph_Calcium_Assay/data/20201125/plate3.PNG
- plate 4: https://github.com/shellywanamaker/P_generosa/blob/master/Hemolymph_Calcium_Assay/data/20201125/plate4.PNG
- data here:
- I attempted to read the plates on the old Seeb’s lab plate reader, the Perkin-Elmer Wallac 1420 Victor3. It already had the 555nm filter installed, which is the one Chris Monson ordered and installed a while back. The bandwidth on that filter is +/- 38nm so it should cover the range (570-590nm) required by the kit
- I had to set the filter up to read absorbance since Chris had it set up as a fluorescence only filter. I just had to go under the filters… menu to do this and check off the absorbance box
- I created a new protocol called “Absorbance @ 570 (1.0s)” and protocol description is noted in the results files under the ‘Protocol’ tab
- I read all the plates around 3pm
- Data are here:
- plate 1: https://github.com/shellywanamaker/P_generosa/blob/master/Hemolymph_Calcium_Assay/data/20201125/STRIGG_20201125_plate1.xls
- plate 2: https://github.com/shellywanamaker/P_generosa/blob/master/Hemolymph_Calcium_Assay/data/20201125/STRIGG_20201125_plate2.xls
- plate 3: https://github.com/shellywanamaker/P_generosa/blob/master/Hemolymph_Calcium_Assay/data/20201125/STRIGG_20201125_plate3.xls
- plate 4: https://github.com/shellywanamaker/P_generosa/blob/master/Hemolymph_Calcium_Assay/data/20201125/STRIGG_20201125_plate4.xls